Yes, but the headset and speakers
can not be used at the same time and the headset
must have a USB and not a mini-plug connector.*
Once GP4 is configured this way, it is a simple matter to switch quickly between the headset mode and the speaker phone (speakers) mode during a meeting by clicking an icon on GP4.
This option is typically used by guests or students who may need to speak infrequently during a class or meeting and wish to listen to the audio through their computer speakers and only use the headset when required to speak. It is also useful when parents want to listen into classes along with the students, especially during the first few weeks of school.
Note: The computer only allows one audio device to be active at a time so it is
not possible to have sound play through both the speakers and the USB headset together.
There are three sections below that describe the steps required to
Configure,
Test and
Use GP4 with this option.
The
fourth section explains how to restore the factory default configuration of using the preferred device as set in the control panel of your computer.
*
This article shows the difference between the USB and mini-plug connectors and ports for audio devices on your computer.
- Make sure the USB headset is plugged into the computer before the GP4 program is started.
If the headset is not plugged in and GP4 is already running, exit/quit GP4 and plug the headset in.
- Open the GP4 software.
- Open the Preferences dialog by selecting the Preferences menu item as shown below.
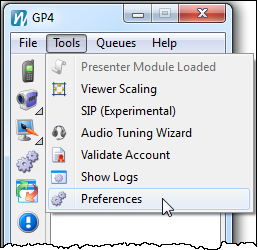 |
PC users select Preferences from the Tools menu. |
|  |
Mac users select Preferences from the gp4 menu. |
|
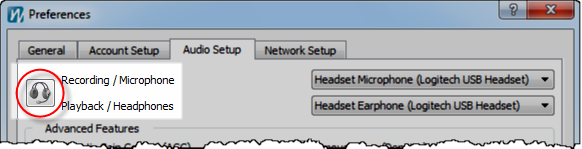
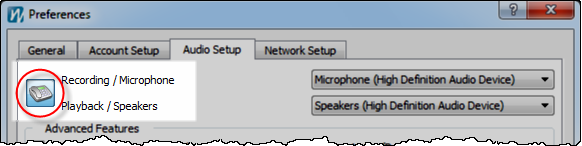
- The headset icon should be visible next to the Recording / Microphone and Playback / Headphones labels.
If a speaker phone icon is visible, click the icon and it will change to the headset icon.
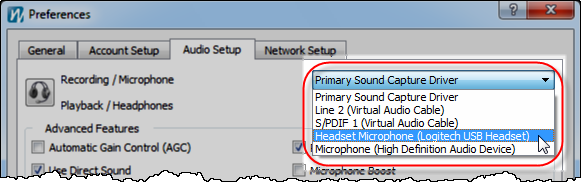
- Select the USB headset from the drop-down list for both the Recording / Microphone and Playback / Headphones devices and click the Apply button.
- Click the headset icon to toggle it to the speaker phone icon and switch to the speaker phone settings.
- Select the sound card from the drop-down list for both the Recording / Microphone and Playback / Headphones devices and click the Apply button.
Mac users should select the option that starts with 'Built-in' at this step.
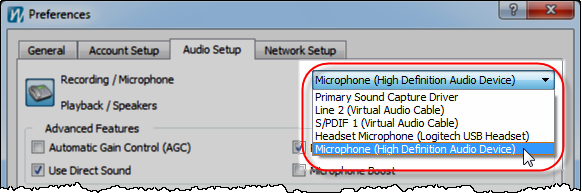
Notes: The sound card will be the option that:
- Does NOT start with the text 'Primary Sound'.
- Is NOT the headset option selected in the previous step.
NEVER select the headset microphone for the input device of the speaker phone. Doing so will cause an echo in the meetings when your microphone is unmuted.
There are many different brands of sound cards so the name in your menu may be different than what appears in these images.
- Click the OK button on the Preferences dialog.
- You should now see the headset icon on the GP4 interface (shown below). If it does not appear, the headset and speaker phone input and output devices are set to the same things. To correct this, go back to Step 4 and re-set the devices again.

- Test the settings to make sure the correct devices are selected.
- Test the new settings by putting on the headset and clicking the Audio Tuning Wizard button on the GP4 interface.
This will open the Audio Tuning Wizard dialog.
- Click the Start Test button to begin the test.
You should hear the first two prompts through the headset earpieces.
On the third test, make sure the in-line muting control is not engaged and then speak into the microphone.
You should hear your voice played back through the headset earpieces.
- Click the OK button at the Congratulations dialog and then close the Audio Tuning Wizard dialog.
- Click the headset icon on the GP4 interface - it should change to a speaker phone icon.
If there is no headset or speaker phone icon on the GP4 interface, as shown above, the headset and speaker phone input and output devices are set to the same things.
A quick way to tell is by clicking on the icon on the Preferences dialog while looking at the input/output device fields and then clicking the icon again. If the values don't change, then you need to go back to the previous Step 4 and re-set the devices again.
- Click the Audio Tuning Wizard button again. This will open the Audio Tuning Wizard dialog.
- Click the Start Test button to begin the test. You should hear the first two prompts through the computer speakers. Click the Cancel Test button at the microphone test and then close the Audio Tuning Wizard dialog.
- Once the settings are tested to your satisfaction, refer to the Using GP4 section below to see how to switch between the speaker phone and headset options.
The default audio device for GP4 is the headset so that is the icon that will be visible initially when GP4 is started.
Once you are in a meeting, you can click the headset icon on the GP4 interface to switch the audio device to the speaker phone so the sound plays through the computer speakers.
Note that this is how parents typically listen in on the classes. Then, if the student needs to speak, they can put on the headset and switch to the headset mode by clicking the speaker phone icon and toggling it to the headset icon to speak into the microphone. After they are done they can switch back to the speaker phone mode by clicking the icon again to get the sound to play through the speakers.
If there is no
headset or speaker phone icon on the GP4 interface, go to the
Step 4 in the
Configuring section above and re-set the devices.
Note: Setting GP4 back to the factory default settings will return the audio devices to the preferred devices listed in the sound control panel on the computer.
Depending on your configuration and settings, that is typically either the speakers or a USB audio device that is plugged into the computer at the time.
- Open the GP4 Preferences and navigate to the Audio Setup tab as shown in steps 2 - 4 in the Configuring section above.
- Select the device that starts with the text 'Primary Sound' for both the Recording / Microphone and Playback / Headphones devices.
Mac users should select the option that starts with 'Built-in' at this step.
- Click the headset/speaker phone icon to the left of the Recording / Microphone and Playback / Headphones fields to toggle it to the other device icon. e.g. If a speaker phone icon is visible, click the icon and it will change to the headset icon.
- Select the device that starts with the text 'Primary Sound' for both the Recording / Microphone and Playback / Headphones devices.
Mac users should select the option that starts with 'Built-in' at this step.
- Click the Apply button and then click the OK button on the Preferences dialog.
- The headset/speaker phone icon should no longer be displayed on the GP4 interface (refer to the image above).