There are two options guests can use to join a meeting using VoIP:
Option 1 is using a Java enabled Web browser (the majority of guests will use this option).
Option 2 is to download the guest version of GP4 (typically for frequent guests or students of online schools).
See the details of each option below.
If you want your guests to join your meeting using VoIP without having to download the GP4 guest version, they need a Java enabled browser with Java 1.3 or higher installed.
Guests can test their browser at
http://www.gatherplace.com/gp/test.jsp to make sure they have the necessary version of Java installed and can download the latest version of Java free from our website at
http://www.gatherplace.com/java.
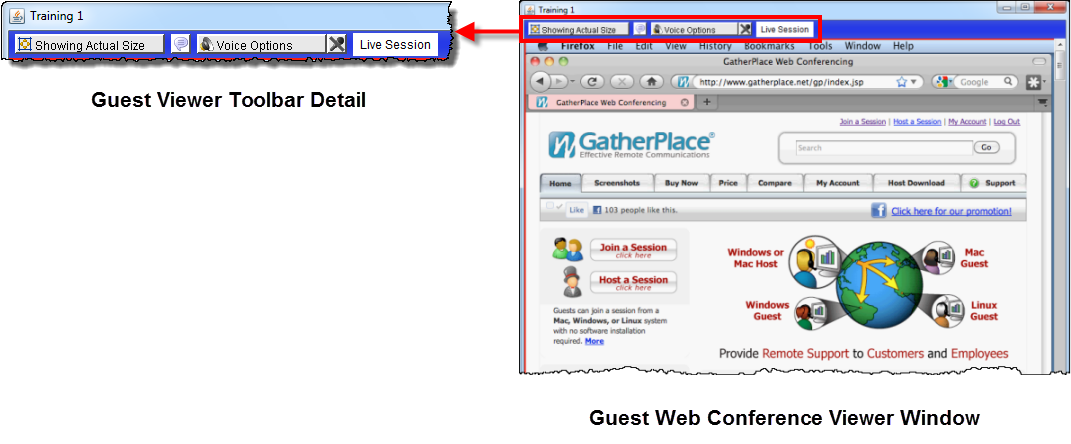
- Once they join your meeting, the guests need to click the
 button at the top of their Web Conference Viewer window (shown below).
- The Voice Dialing Options dialog will appear where they will be able to select their Internet connection type, as well as the desired input and output audio devices from the drop-down menus.
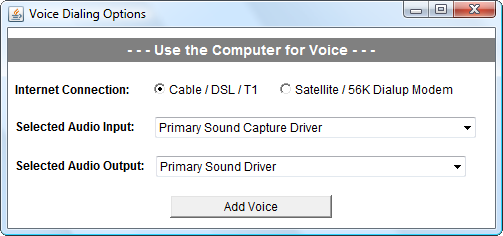 |
| The Voice Dialing Options dialog (meeting configured for VoIP only). |
- Once they have the desired device(s) selected, they need to click the Add Voice button on the Voice Dialing Options dialog.
- The guests will then hear a recording that says 'This meeting may be recorded' and they will be placed into the audio portion of the meeting.
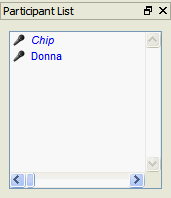
- The host will then see a microphone icon next to the guests name in the Participant List to indicate the guest has joined the voice portion of the meeting.
If the guest does not have a microphone icon next to their name, they DO NOT have sound capabilities and will not be able to hear or speak using their computer during the meeting.
In order to correct this, see the troubleshooting guide below.
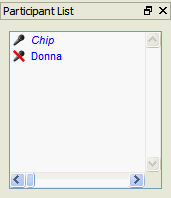
Host (Chip) View of Participant List
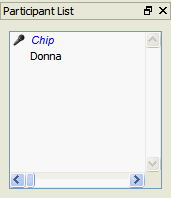 | | Participant (Donna) joined without voice option. |
| | | |  | | Participant (Donna) with voice connected and microphone muted. |
| | | |  | | Participant (Donna) with voice connected and open microphone. |
|
Note: In order for the guests to speak, the host may need to un-mute them by clicking the microphone icon next to their name.
If the guest has a red line through their microphone icon either next to their name in the participant list (shown above) or on their microphone button on the viewer window (shown below), they will not be able to speak.
Guests having difficulty speaking in the meeting should also make sure the in-line mute or volume control is set correctly on their microphone or headset.
They can also test their microphone prior to joining a meeting using the Windows Sound Recorder to make sure everything is in working order (
see this article).
 | | Guest Microphone Muted Image |
|  | | Guest Microphone Un-Muted Image |
|
| Symptom | Possible Cause(s) | Solution |
| Guests Hearing |
| Guest does not have a microphone icon next to their name in the host participant list. | - Guest has not selected the voice option yet.
- Guest has an older version of Java installed.
| - Have the guest click the Voice Options button on their viewer window, select the correct output device and then the Add Voice button on the Voice Dialing Options dialog.
- Have the guest test their Java version at http://www.gatherplace.com/gp/test.jsp, upgrade to the latest version at http://www.gatherplace.com/java and re-join the meeting.
|
| Guest has a microphone icon next to their name, but cannot hear the audio. | - Sounds are muted on the Guest's computer.
- Sound volume is set too low on the computer or the in-line volume control of their speakers/headset.
- The audio device (speakers or headset) is not plugged in or is plugged into the wrong port(s).
- The wrong output device was selected in the Voice Dialing Options dialog.
- The audio device is defective.
| - Open the sound control panel and un-mute the sounds.
- Adjust the volume in the sound control panel on the computer or on the in-line control of the headset/speakers.
- Unplug the output device, check for the correct port, plug the device back in, click the Voice Options button and select the correct output device.
See this article for identifying ports and connectors on the computer. - Click the Voice Options button and select the correct output device.
Note: USB devices may need to be un-plugged and plugged back in for them to appear in the device list. - Try using another program to test sound on the computer to verify that the device is not defective.
The Windows Sound Recorder installed on most PC's works well for testing both the input and output hardware, as well as the devices.
See this article on using the Windows Sound Recorder.
|
| Guests Speaking |
| The guest cannot be heard when they are speaking. | - Guest has not selected the voice option yet.
- Guest has the wrong input device selected.
- The guest is muted in the conference.
- The guests microphone is muted in the sound control panel on the computer.
- The guests microphone volume is set too low in the sound control panel on the computer.
- The in-line Mute function of the microphone/headset is engaged.
- The microphone/headset/input device is not plugged in or is plugged into the wrong port.
- The audio device is defective.
| - Have the guest click the Voice Options button on their viewer window, select the correct input device and then the Add Voice button on the Voice Dialing Options dialog.
- Have the guest click the Voice Options button on their viewer window, select the correct input device.
- The host should either click the microphone next to the guests name in the participant list or click their name and select the 'Allow to Speak' option from the menu to un-mute them.
- Open the Sounds control panel on the computer and un-check the Mute option under the microphone device.
- Open the Sounds control panel on the computer and adjust the volume for the microphone device.
- Click the in-line Mute button on the microphone/headset to un-mute the microphone.
- Unplug the input device, check for the correct port, plug the device back in, click the Voice Options button and select the correct output device.
See this article for identifying ports and connectors on the computer. - Try using another program to test sound on the computer to verify that the device is not defective.
The Windows Sound Recorder installed on most PC's works well for testing both the input and output hardware, as well as the devices. See this article on using the Windows Sound Recorder.
|
This option is recommended for frequent guests, such as online students or groups that meet repeatedly and want to use two-way VoIP heavily in their meetings.
For these cases, guests can download a free version at
http://www.gatherplace.com/client/.
- After the guest has GP4 installed, they should click the Audio Tuning Wizard button to configure the input and output devices they wish to use with GP4.
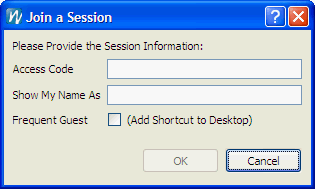
- Each time GP4 is opened, the guest will be prompted for the access code of your meeting by the Join a Meeting dialog (below).
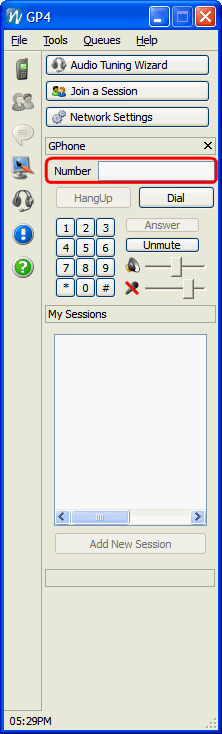
- Optionally, if GP4 is already running, guests can put the access code into the Number field on the GPhone panel* and click the Dial button to be connected to your meeting.
* If the GPhone panel is not visible, have the guest click the GPhone icon ( ) and it will appear.